 We are always preaching that you should spend time every day building your networks. Those networks can be social media followers, personal contacts, professional groups or in this case email lists. If you don’t already have an email list then in the next 10 minutes you will have one started. In this article we are going to cover:
- A simple way to get started collecting email addresses on websites and social media
- Using Gmail for your list to get started getting subscribers
- Automating your subscription sign ups with Gmail
If you already have a list setup and are looking for ways to increase your list or improve your campaigns we have a lot of free resources on this site. Here are 3 to get started with:
- How to Create Twitter Lead Generation Cards to Grow Your Email ListStart Your Email List the Easy Way
- Create Scarcity Email Marketing Campaigns in 3 Easy Steps to Increase Sales
- Email Marketing Questions Answered – Ask Me Anything, FAQ Page
Getting Started Creating Your Email List
The easiest way to get started on building your email list is to add an email address to your website and social media. Simply tell people “I am starting a great email address on Digital Subscriptions. Email me at smooar+subscribe@gmail.com to sign up.” Replace “Digital Subscriptions” with your topic.
This is exactly how this email list started with the original topic Print & Digital Subscriptions. Sending me an email is how some of you signed up for this newsletter. You can still see the original blog post introducing the newsletter here – Coming Soon – Print and Digital Subscription Newsletter.
A couple more tips when getting started creating your email list:
- Make the email address a hyperlink, so when the subscriber clicks on the address it opens a new email already populated with your address.
- Take a step further and use ShareLinkGenerator.com to create a link to your email. To see how a Share Link Generator email link looks, click here and send me an email.
- Studies show that social media posts with images get more engagement. Go to Canva and create an image telling people to sign up for your list. I recommend using the 800 x 800 social media post template on Canva. It will work for most social media posts and you can easily re-size and use on your website. (For more on Canva, go to Three Free Tools I Use Every Day.)
- Create a page on your website or a blog post about your email list. Include your email address for subscribing and tell people what to expect from your newsletter. Direct your social media posts to this page.
Setting Up Your Gmail Address
Most web hosting comes with thousands of free email addresses, so setting up a dedicated address for your list is very easy and economical. But, if you are just getting started and are using a free hosting option for your site or are using a free blog option like WordPress.com, Blogger, or Tumblr, you may not have an email option. Also, even if you have hosting with email addresses the automation features may be limited to just vacation responses.
This is where Gmail comes in handy. There are other free email options but you will see why Gmail just makes sense when we start talking automation. Set up an email address that matches your brand or topic. Email length is something to consider, but since you are going to use a hyperlink for your subscribers it is not a big concern. I already had a Gmail address when I set up the Print & Digital Subscription Newsletter, but if I was setting up an email address from scratch I would try to get something like “Subscriptions” or “PrintAndDigital”.
Once you have your Gmail address, let’s go back to our invite message, “I am starting a great email address on Digital Subscriptions. Email me at smooar+subscribe@gmail.com to sign up.” Take note of the “+” sign. If you add a “+” sign between your Gmail username and @gmail.com, the email will still get to you. So, if I had setup a Gmail account using “PrintAndDigital”, my invite address would be PrintAndDigital+subscribe@gmail.com. Also, using the same logic I could setup email addresses for customer service or sales by just adding something like “+CSR” or “+sales”.
Using Gmail To Automate Your Email Subscriptions
Now that you know about “+”, it is time to learn how powerful it can be. First, you want to create a folder in Gmail to collect your subscribers sign up emails. In Gmail, follow these steps to set up a folder, which is also referred to as a label in Gmail:
- Open Your Gmail Inbox in a web browser.
- Select any email in your inbox and the menu below will appear.

- Click on the folder button circled on the image above to expand the folder menu.
- Scroll down to the bottom of the folder menu and click “Create new”.
- A window will appear asking you to name for your new label. Use something like “subscribers” and click save.
- The label will show up in the list of labels/folders on the left side of the Gmail window.
Now that you have a label setup in Gmail for you email subscribers, in your Gmail inbox, you could click the checkbox next to each email from a new subscriber and manually move them into your subscriber folder. Instead, you want to automate this process and send your new subscribers a welcome email.
In Gmail, to set up the welcome email we are first going to set up the Canned Response Lab. The Canned Response Lab will add an option to the Compose email window for creating Canned Responses, which we will use to create your welcome email. To do this we need to enable canned response by:
- Opening Your Gmail Inbox in a web browser.
- Click on the Settings Menu, which is the Cog image in the top right corner of the screen.
- Select “Settings” from the menu.
- Go to the “Labs” tab
- In the search for a lab textbox, type “canned” without the quotes and click enter. The only lab item that should appear is “Canned Responses”.
- Click the enable radio button and save your changes.
Now that Canned Responses lab is set up, go back to your Gmail inbox. To set up your welcome message:
- Click the COMPOSE button to open the “New Message” window.
- Leave recipients blank, but add a subject and compose your welcome message. You can always go back and edit your message later. In fact, you will want to do this 0ften as you promote different items in your welcome letter. Here is what my first welcome letter looks like:
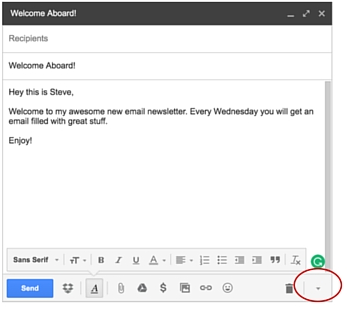
- In the bottom right of the “New Message”, there is an arrow that expands the “More options” menu. This is shown in the image above circled in red.
- Expand the “More options” menu and select “Canned Responses” and “New Canned Response…”
- Give your canned response a name. Unfortunately, the name will override the subject, so I am naming my canned response “Welcome Aboard”.
- Close the Message Window
We now have a folder to save our incoming subscriber email and a welcome message to send to new subscribers.It is now time to tie it all together with automation, which in Gmail is referred to as an “action”. We are actually going to set up 2 actions. The first will label our email with our folder name that we created and the second will send the welcome email. Here is how we set it up:
- Opening Your Gmail Inbox in a web browser.
- Click the checkbox next to an email from a subscriber. It should be sent to your email using the “+” address. If not send one to yourself using another email address that you have.
- On the “More” menu select “Filter messages like these”
- The filter will automatically populate the “From” field. Delete the email address in the from field and add your subscriber email address to the “To” field. In my case it is smooar+subs@gmail.com.
- Click “Create filter with this search” in the bottom right of the window.
- Now we select what we want Gmail to do when the message arrives. Click the box for “Apply the label” and select the label you set up earlier.
- Click the box for “Send canned response” and select the canned response we set up earlier. Your screen should look something like this:
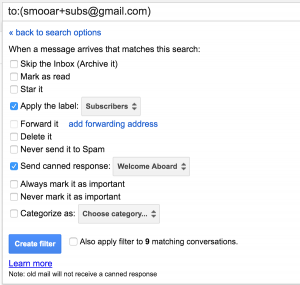
- Gmail has also inspected the inbox and has found 9 other emails that match the filter. These are more subscribers and I want them to get the welcome email and be placed in my subscriber folder too. Check the box to “Also apply filter to 9…”.
- Click the Create Filter button and bam you are done.
- Send yourself an email to test.
That it! You are now collecting email addresses on your own website. Every person that subscribes to your email list is getting a welcome message. You can even send your newsletter using Gmail. You were able to set up your email list and start collecting email addresses in 10 minutes and best of all you are using tools that do not cost you anything. After all, why should you spend money before you have proof that your newsletter is viable?
If you have any questions or comments about this post, email us at Sales@EagleStrategyGroup.com or use the comment section.