Installing the Facebook Pixel in a WordPress Site is Easy!
One of my goals for 2017 is to become an expert on Facebook Advertising. But, I am not waiting until 2017. I started last week. My approach is:
- Go back and look at the results for Facebook ads that I have run in the past.
- Review podcasts that I normally listen to and listen to the episodes related to Facebook Advertising.
- Read the materials referenced in the podcasts.
- Read Facebook’s documentation on advertising.
- Hit the Google machine and make very specific searches like “How do I install the Facebook Pixel on WordPress?”
Old Facebook Pixels vs. the New Facebook Pixel
One of the issues that I had in the past with Facebook was getting the pixel working on WordPress powered websites. You had to install multiple pixels, one for tracking and one for conversion. Ultimately I ended up flying blind and just run ads without the pixel.
In 2015, Facebook introduced a new Facebook Pixel. They took a Lord of the Rings approach and have one pixel to rule them all. They also have a slick wizard in the Facebook Ad Manager Console to configure the code that you copy into your website.
Why is the Facebook Pixel Important?
The Facebook pixel allows you to track visitors on pages that the pixel is installed. It is similar to Google Analytics, however, the pixel ties visitors back to the Facebook universe. Install the pixel on the home page of your website and Facebook will track the visitors. and if they are logged into Facebook in the browser or device they are using, then Facebook knows who they are.
If your website visitor is logged into Facebook in the browser or device they are using, then Facebook knows who they are. You can’t see who they are, but you will be able to use this data to target your ads. You can also look at profile data on your visitors like age, geography, interests, etc.
This is why I recommend installing the Facebook pixel now, even if you have no intention of doing advertising in the near future or ever.
Getting Started with the Facebook Pixel
The first thing you need to do is setup a Facebook Pixel. As I mentioned previously, I had played around with some advertising and already had a Facebook pixel set up.
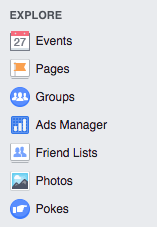
Facebook Explore Menu
To see if you already have a pixel or to set one up for the first time:
- Log in to Facebook on a desktop web browser. The desktop is important, I have noticed on a mobile phone browser some menu items are missing. Not sure if that is the case for a tablet browser. (Maybe someone can let us know in the comments section?)
- When you log in to Facebook on the left menu bar click “Ads Manager” under the Explore heading. You can see this in the image to the right.
- In Ads Manager, at the top left there is a menu shown as 3 bars followed by “Ads Manager”. Click on this menu, then “Pixels”.
- Click on the button “Facebook Pixel” and follow the wizard.
If you can easily edit the HTML header on your website you can copy and paste your pixel code to where you need. If you use WordPress like me, then there are multiple options for installing the Facebook Pixel.
We have created a Facebook Pixel Guide that includes information on WordPress Plugins you can use to install the Facebook Pixel. The guide also includes step-by-step installation tutorials for the two plugins I have used.
Click here to get the Facebook Pixel Guide
How to Check if Your Facebook Pixel is Working
This is very easy if you use the chrome browser. There is a plugin for Chrome called Facebook Pixel Helper. Theis is how Facebook described helper:
The Pixel Helper works in the background to automatically review the websites for code that looks like the Facebook Pixel. When a website has a Facebook Pixel installed the </> icon in your browser turns blue and a small badge will appear indicating the number of pixels found on the page.
After installing the Facebook Pixel Helper in your chrome browser, it shows as a gray </> icon on the browser to the right of the address text field (where you type in the website address). After installing the Facebook Pixel, this is what the icon looks like in Chrome when I visit on EagleStrategyGroup.com – ![]()
If you click on the icon in your browser, it gives you more detail in a pop-up window that looks like this:![]()
To install the Facebook Pixel Helper open this link in you Chrome Browser. For documentation on the Facebook Pixel Helper, go to the Facebook for Developers documentation on the Facebook Pixel Helper.
Installing Facebook Pixel in WordPress with the Facebook Conversion Pixel Plugin
We have created a Facebook Pixel Guide that includes information on WordPress Plugins you can use to install the Facebook Pixel. The guide also includes step-by-step installation tutorials for the two plugins I have used.